
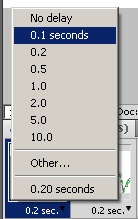
(Be sure to change your frame rate to 0.1 seconds)
To begin with, choose to make a Film and Video file on Photoshop, and select the appropriate settings for your file type. This will create your 'Stage' for the animation. When it opens, the bottom of the window should have a tab labelled "timeline", it might be more suitable to click the button shown here:


This button will change into a more manageable view, to see the individual frames easier, as well as easy navigation.
Now we draw a line, to simply show where our ball is going. Draw circles on the line to show the trail, but put fewer on the descent (as there will be less frames here, gravity will increase the speed of your ball), and bunch up more towards the higher points to show the slower speed of the ball.

You can begin to draw your ball by using the shape tool on the toolbar to the left of the stage. Make a new layer and make the ball roughly the same size as the circles you have drawn on your trail, and place it so it is just partially onto the stage. (You can see mine just peeking through on the left)

Add a new frame on the timeline below by clicking this button under your timeline:

The new frame will pop up, and you can now move the ball allow to the next step on your trail, adding a new frame after each small movement.
When your ball is about to fall, stop there. This is where we take it to the next step.

To make the ball have the appearance of squash and stretch, create a new frame - then make a new layer and draw another ball, this time, make it more of an oval shape. Then twist it to point in the direction the trail is going like so:

Leave the original ball where it is and now move the oval along the trail (using less frames than before) until you reach the end of your descent.


Follow the trail again, and then place the horizontal oval at the bottom of the descent. Repeat for the number of bounces you have drawn for your trail.
If you play it back. It'll look messy and untidy. What we are going to do is clean it up a bit to make it look like there is just one ball.
By placing the three shapes on separate layers, you can make them invisible by clicking the eye on the taskbar by the layer you wish to hide.


(You can see the difference in shape between frames)
Now click on the background and paint it completely white to remove your trail.

Your ball will now look 'free' without following the trail we had drawn previously.


Name your file and select the appropriate file type (For me it's Quicktime (.mov)) and click Render.
It is now complete, and you can view it in your documents.
No comments:
Post a Comment